
From slide to room, in a few steps.
MIDI-HA Bridge connects three things you already run: Logos Proclaim sends a MIDI note, macOS carries it on a virtual port, and the app calls Home Assistant. Set each one up once and a slide can run the whole room.
Before you start
A short checklist — gather these first and the rest takes about a minute.
- A Mac (Apple Silicon or Intel) running MIDI-HA Bridge.
- Home Assistant reachable on the same network (e.g.
http://homeassistant.local:8123). - A MIDI source — Logos Proclaim, or any app that can send MIDI (ProPresenter, Ableton, Logic, QLC+).
1 · Home Assistant — create an access token
MIDI-HA Bridge talks to Home Assistant with a Long-Lived Access Token. You create it once.
-
Open your profile
In Home Assistant, click your user name (bottom-left) to open your profile, then open the Security tab.
-
Create a Long-Lived Access Token
Scroll to Long-Lived Access Tokens → Create Token. Name it
MIDI-HA Bridge. -
Copy it now
Copy the token immediately — Home Assistant shows it only once. You will paste it into the app in the next step.
http://homeassistant.local:8123 or your http://<ip>:8123. You will need it next.2 · MIDI-HA Bridge — install & connect
Everything below is set inside the app — no files to edit by hand, no YAML.
-
Install
Open the
.dmg, drag MIDI-HA Bridge to Applications, and launch it. It runs from the menu bar with no Dock icon. -
Open Settings
Click the menu-bar icon and choose Settings…
-
Connect Home Assistant
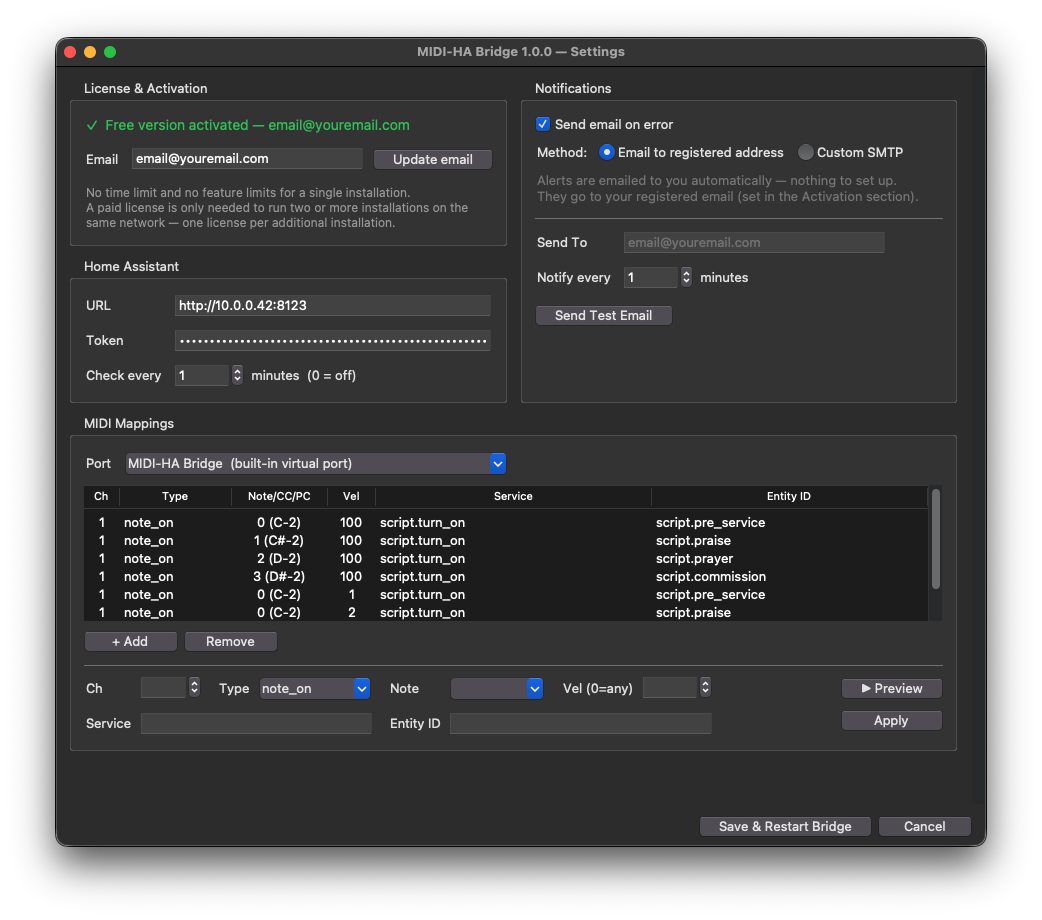
Paste your HA address and the Long-Lived Access Token from step 1. The app confirms the connection.
-
Pick your MIDI port
Leave it on MIDI-HA Bridge (built-in virtual port) — the app creates this port itself, so there is nothing to set up in macOS. (Advanced: you can instead pick an IAC bus or a hardware port for custom routing.)
3 · Proclaim — send MIDI on a slide
Proclaim sends MIDI through its Lighting/MIDI feature. Point it at the MIDI-HA Bridge port and pick a note for each cue.
-
Enable outbound MIDI
In Proclaim, select MIDI in Lighting Scene > Add control and select
MIDI-HA Bridgeas the destination. -
Add a Signal to a slide or cue
Attach a MIDI Note On signal to the slide or service item that should change the room — for example the first worship slide, the sermon slide, or a “lights down” cue.
-
Choose a note number
Give each cue a distinct note. You will map those same notes to Home Assistant actions in the next step.
MIDI-HA Bridge port.4 · Map notes to actions
The final link: tie each incoming note to something Home Assistant can do.
-
Add a mapping
In MIDI-HA Bridge Settings, add a row for each note: the note number from Proclaim on the left, the Home Assistant action on the right.
-
Pick the action
Choose a scene, a script, or any service —
scene.turn_on,script.start_service, a light, a switch, anything Home Assistant exposes. -
Save & test
Save the settings, then advance the matching slide in Proclaim. The room should follow the cue.